Pages

Thursday, May 29, 2014

Baby Bee's Nursery Reveal!

It is finally time for the reveal of Baby Bee's nursery.  I am super happy with how the room came out and I am super excited for Baby Bee to be able to use it (basically I am super excited for him to just come out already!).  The room was definitely a labor of love and took a while to come together, but I think in the end it was worth it!

This is the view from the door to the room...


I used this Ikea bookshelf to organize toys, blankets, and of course books.


I love the quote from Walt Disney and the Mickey was a present from one of my students.  The gray chevron box held a present from my shower and now hides burp cloths.


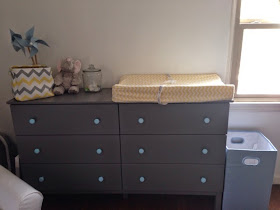
We painted this Ikea dresser (and by we I mean Mr. B), which has a ton of storage.  I used a craft paint to give the handles a hint of color.


I got the yellow and gray chevron fabric storage container from Home Goods and used it to hold diaper changing essentials.  I put our pacifiers in a glass jar from the kitchen section of Target.  The blue pinwheels were decor at my shower, I displayed them in a white vase I already had.


The framed Mickey ears water color was a present from my mom and one of my favorite things in the nursery.  The onesie is from our pregnancy announcement photos and I created the printables using this method.


I found some adorable monkey door hangers and gave them a coat of paint in our nursery colors to hang on the closet door for towel storage.


I hung the DIY nursery art I created above the crib.


I found this awesome ottoman at Home Goods and was stoked with how perfectly it matched the nursery.  Mr. B used this nifty contraption to turn an Ikea chair into a rocker/glider that is now super comfy.


The DIY mobile I worked on for hours is hung near the crib.


And here are some more overview shots...


Everything is ready for Baby Bee, all this room needs now is a baby!

DIY Nursery Mobile

The countdown is seriously on people, Baby Bee could be here at any minute!  Mr. B and I have been busy getting the house ready for the impending arrival, leaving very little time for much else.  Especially since I require long breaks after even short bursts of activity.  We did manage to get the nursery all set and ready to go, make sure you check back later this week for the reveal!  This was a major project (read: time consuming) that I have been working on for a while, and I can't even tell you what a relief it is to have it done!  I used these images as my inspiration for my DIY mobile, and as usual, put my own spin on things.  Here is how it came out!


The first step in this project was to get the rings ready.  I bought two sets of embroidery hoops, one slightly smaller than the other.  I got rid of the hoops with the adjusters and just used the plain hoops.  I used basic craft paint to give them a bit of color.


Then came the first bit of tedious business, cutting out the shapes.  I used a 2 inch circle punch to cut out about 100 circles each in my three nursery colors: blue, yellow and gray.  I used my Silhouette to cut out the animal shapes.  They are the same as the ones I used for my DIY nursery art.


I used a clear thread to string everything together.  I put a piece of double stick tape on the back of the shape and stuck the thread to it.  I quickly discovered that the double stick was not going to be enough, so after attaching the thread to the double stick tape, I also covered it with a piece of regular Scotch tape.  Not super pretty, but it's hard to tell with the finished product.


Then came the part that was super frustrating, and hence, no pictures.  But here is what I did.  I used packing tape to attach each of the strings to the hoop, taping on the inside of the hoop.  Once the hoops were set, it was time to attach them to one another.  This required some help from Mr. B.  First, I attached twine to the smaller hoop, then had Mr. B hold the bigger one while I tied the two together.  Then I had him hold onto the bigger hoop while I threaded some ribbon through, which we used to hang the mobile in the nursery.  I criss-crossed two ribbons so the mobile would hang straight.  Mr. B used a basic thumbtack to hang the mobile in the nursery.  Here is the mobile, and a sneak peek at the final nursery reveal!


Luckily, I really love how the mobile came out, otherwise I would be super annoyed with how long it took!  Word to the wise:  leave yourself plenty of time if this is a project you are going to tackle!

**This post contains affiliate links.  If you click these links and purchase the products, I will receive a small commission.