Friday, April 12, 2013
Taking a Little Vaycay
Hey y'all! Happy Friday! I wanted to pop in a wish you a wonderful weekend, and let you know I'm going to be on a mini hiatus next week. I have been working on my school's musical for the past several months, and next week is Opening Night! I am super excited and have had a ton of fun directing this production (Rodger's and Hammerstein's Cinderella), but it has been a ton of work! Next week is going to be pretty insane so I won't be stopping in here much. But definitely check back for me the following week! Thanks so much for reading and have an awesome weekend/week!
Thursday, April 11, 2013
Utensil Holder with Handwritten Recipe
Hey y'all and happy almost Friday! It's back to the grind as usual for me this week, and it is going to be a crazy month! Which means I'm probably going to be eating a lot of cookies. So I decided to make this utensil holder that I first spotted over at Calico.

The tutorial was a bit complicated for my tastes, so I decided to employ the same steps I used for my DIY Jewelry Tray. I found this plain white utensil holder from Crate and Barrel, and grabbed my trusty black paint pen.


And there you have it! Super cute and super easy to make. This baby would make a great bridal shower present, even better if you wrap it in my personalized heart monogram tote bag!

The tutorial was a bit complicated for my tastes, so I decided to employ the same steps I used for my DIY Jewelry Tray. I found this plain white utensil holder from Crate and Barrel, and grabbed my trusty black paint pen.
I hand wrote my favorite chocolate chip cookie recipe, trying not to be too perfect about it.
And there you have it! Super cute and super easy to make. This baby would make a great bridal shower present, even better if you wrap it in my personalized heart monogram tote bag!
Wednesday, April 10, 2013
Wedding Wednesday: Red and Teal Inspiration Board
Hello lovely readers! Today I want to share some inspiration for one of my favorite color combos: red and teal blue. I absolutely love these two colors together, especially since they lend themselves easily to any sort of wedding. The colors can feel vintage or modern, depending on how you style them. Check out some of these awesome images!

Gorgeous, right? Not a common combo, but a super fab one!
Photo credits, clockwise from top left: invitation 1, table 1, invitation 2, table 2, cake, table 3, table 4

Gorgeous, right? Not a common combo, but a super fab one!
Photo credits, clockwise from top left: invitation 1, table 1, invitation 2, table 2, cake, table 3, table 4
Tuesday, April 9, 2013
Check Out Some of My New Etsy Shop Items!
Even though I was crazy busy getting stuff done for my show at school over my Spring Break, I did manage to find some time to work on developing new ideas and designs for my Etsy shop, The Bees Times Three. Today I wanted to share some of those new items with you!
First, I listed some new tote bag designs, which I am totally in love with...


First, I listed some new tote bag designs, which I am totally in love with...
This California tote bag is perfect for summer, and it can be customized with any state!
This bag has the word "love" written on it...
This one might be my favorite, it is a heart with custom initials inside it. Perfect for a bridal shower/bachelorette/wedding gift!
I'm also branching out a little and adding in some new items, like these fabric button earrings, in all kinds of colors and patterns.
And another one of my favorite items is this "love" pillow cover. How cute would this be in a baby girl's room? Perfect for a new little one!
And even more items will be coming soon! Make sure you head over to Etsy and visit The Bees Times Three!
Monday, April 8, 2013
DIY Love Letters
Hello and happy Monday! Welcome to another week! It's back to the trenches for me this week, but I'm still going to be sharing some super cute projects with you! I pinned this awesome LOVE sign from Justine Smith and decided to try it myself:
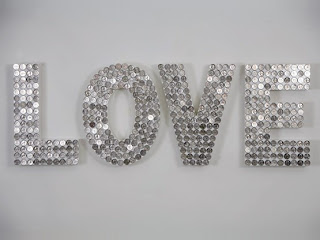
The image above uses coins for the sparkle factor. Originally I was going to use sequins to achieve the same look. I found my letters at a local craft store and gave them a silver painted base coat.


I started arranging the silver sequins on top of the letters, but I was not loving the look. It was hard to cover the squarish letters with round sequins and I didn't like the look of overlapping sequins. So instead of sequins, I went to my old standby: glitter. I brushed on some glue and covered the letters with a light dusting of silver glitter. Even though the end result is different from my original inspiration, I still love the finished product!

These letters would be a great addition to any room. You can spell out whatever you want and you could use a ton of different colors. The sky is the limit!
Thursday, April 4, 2013
Etsy Profile: Hoot Owl Press
Hello lovely readers and happy Friday! Since I have been on Spring Break this week, it has almost been like a week full of Fridays, but I have been so busy with crafting and blogging and creating stuff for my Etsy shop that it hasn't seemed much like a vacation! One of the best things about joining the Etsy community as a seller has been getting to chat with some of the other amazingly talented people selling their wares. I have been a part of many online communities, as a wedding coordinator mainly, and people tend to not be super friendly and/or helpful (at least in my experience). The opposite is true of the sellers I have encountered on Etsy. Everyone has been gracious, kind, and supportive and because of that, I plan to share some of my great experiences with you. I am not being paid or compensated in any way for this post, this is just a review of my experiences. If I ever am being compensated or sponsored in any way, I will always let you know!
So this post is about my experience with Hoot Owl Press. I contacted Kemble (awesome name, btw) about creating a custom stamp of my new design logo for The Bees Times Three. I wanted to have something I could use in multiple ways, but something that would keep my branding consistent. I love the look of rubber stamps (much cooler than just regular old ink jet printing) so I thought this would be the perfect solution. Here is what I sent Kemble:
 And here is what I received from him a little over a week later:


I busted this baby out of its envelope and got straight to work! I created a tag for my tote bags...

And created a backing card for my earrings and bobby pins (available in the shop soon!)...


So this post is about my experience with Hoot Owl Press. I contacted Kemble (awesome name, btw) about creating a custom stamp of my new design logo for The Bees Times Three. I wanted to have something I could use in multiple ways, but something that would keep my branding consistent. I love the look of rubber stamps (much cooler than just regular old ink jet printing) so I thought this would be the perfect solution. Here is what I sent Kemble:
I busted this baby out of its envelope and got straight to work! I created a tag for my tote bags...
And created a backing card for my earrings and bobby pins (available in the shop soon!)...
Cute right? Kemble was so easy to work with and I am super excited about my new logo stamp! Kemble can make personalized stamps in all different sizes, and has a bunch of designs of his own. Make sure you swing by Hoot Owl Press and check out all his awesome goods!
March Instagram Dump
March is a notoriously long month in the life of a teacher. Smack dab in the middle of Winter Break and Spring Break--with no holidays--means a seemingly never ending work week...after week, after week. However, given that I have been insanely busy, March went by super fast and here are my Instagram moments to prove it!


Not a bad month, eh? Can't wait for my April dump as I have already captured some amazing shots! If you want to follow me on Instagram, click the cute little pink camera on the right hand sidebar. If you want me to follow you, leave your username in the comments and I will check you out!
Got to find a new wine bar just down the street from our house...
Did some house-hunting in West Hollywood with my momma...
Opened my Etsy shop and listed my first items...
Got to go out on the ice before an LA Kings game...
Developed a bit of an obsession with these felt flowers for my tote bags...
Enjoyed one (or two) of my fave alcoholic beverage (other than wine): vodka martini, dirty
A quick glance of my upcoming projects...
Got to see the beginning of the Beatles with the fam...
Mom made these cute little Easter presents for all the kiddies (who are all actually adults)...
The beginning stages of one of my fave bag designs, available in my Etsy shop...
Got to see my man playing at the world famous Baked Potato jazz club...
Not a bad month, eh? Can't wait for my April dump as I have already captured some amazing shots! If you want to follow me on Instagram, click the cute little pink camera on the right hand sidebar. If you want me to follow you, leave your username in the comments and I will check you out!
Tuesday, April 2, 2013
Wedding Wednesday: Wine Bottle Guest Book
Alright all you wine lovers (and since you're all my friends, that's all of you!), this project is for you. When it came time for my wedding, I (no surprises) did a lot of little projects on my own. One, because we were on a tight budget, and two because I love me some crafts (especially crafts that involve wine). This was one of my favorite wedding day projects and we still get compliments on this one!
Here's how I made my prototype:


Gather one wine bottle (yes it is empty; I had a long week, give me a break :)) and a label. I printed out the label from my fancy printer on sticker paper. I incorporated some of the fonts from our wedding invitation and literally spent two minutes getting it formatted and printed. Some tips for the wine bottle: when doing this for real, spend the time to soak off the labels so there is nothing left on the bottle; and, make sure you buy red wine. If you chill a white wine, the condensation on the bottle will ruin the label (unless you get the fancy waterproof ones, which I didn't). Take the label, put it on the bottle, and voila!


Set these out at your wedding with some colorful, fine-tipped, permanent markers. Guests write their messages on the labels and you and your hubby crack the bottles open on the designated anniversary. What a great way to remember your wedding every time you celebrate a milestone together! And, think of the cute display you could make with the bottles once you have enjoyed the wine. Group them together and put flowers in them to make a table centerpiece, or arrange them on top of your wine bar. A creative (and tasty) way to toast your nuptial memories and special anniversaries.
Here are some of the pics of our wine bottle guest book at our actual wedding:


And here are the wine bottles today, on display in our kitchen (one down, four more to go!):


I am so happy we decided on this guest book. It's been awesome to have a daily visual of our wedding and it is great to go back and look at all the sweet (and funny) messages our friends and family left for us.
Here's how I made my prototype:


Gather one wine bottle (yes it is empty; I had a long week, give me a break :)) and a label. I printed out the label from my fancy printer on sticker paper. I incorporated some of the fonts from our wedding invitation and literally spent two minutes getting it formatted and printed. Some tips for the wine bottle: when doing this for real, spend the time to soak off the labels so there is nothing left on the bottle; and, make sure you buy red wine. If you chill a white wine, the condensation on the bottle will ruin the label (unless you get the fancy waterproof ones, which I didn't). Take the label, put it on the bottle, and voila!


Set these out at your wedding with some colorful, fine-tipped, permanent markers. Guests write their messages on the labels and you and your hubby crack the bottles open on the designated anniversary. What a great way to remember your wedding every time you celebrate a milestone together! And, think of the cute display you could make with the bottles once you have enjoyed the wine. Group them together and put flowers in them to make a table centerpiece, or arrange them on top of your wine bar. A creative (and tasty) way to toast your nuptial memories and special anniversaries.
Here are some of the pics of our wine bottle guest book at our actual wedding:


And here are the wine bottles today, on display in our kitchen (one down, four more to go!):
I am so happy we decided on this guest book. It's been awesome to have a daily visual of our wedding and it is great to go back and look at all the sweet (and funny) messages our friends and family left for us.
Monday, April 1, 2013
DIY Jewelry Tray
Hello lovely readers! Have a super easy tutorial to share with you today! Check out this darling jewelry tray, perfect for your vanity or bathroom!

Here's what you need for this project: a white porcelain tray (this one is an appetizer plate from Crate and Barrel), a black paint pen and your favorite quote. That's it!

Make sure your paint pen is nice and inked up. Do some practice letters on a piece of paper to make sure the flow is smooth. Then copy your quote onto your tray. I didn't want it to look too perfect, so I didn't do any measuring, I just wrote it out.

Let it dry and then bring out the jewels! I totally love how it came out and how easy it was to make!

Lots of options and possibilities with this project, so get creative!
Happy Opening Day!
If you are a baseball fan, and I most certainly am, today is an exciting day: Opening Day! I am super stoked to be going to the Dodgers/Giants game today--my very first Opening Day game! So in celebration of the beginning of baseball, I am offering a special deal on my custom baseball tote bags...


Visit my Etsy store and purchase one of my personalized tote bags, enter the coupon code "OpeningDay" and receive free shipping! Remember that I can make any team logo in the team colors, with coordinating felt flower. These bags are awesome for game days, or just around town. This special offer is good until 4/15, so take advantage soon! Feel free to contact me with any questions about special orders. Check out The Bees Times Three on Etsy today!
Visit my Etsy store and purchase one of my personalized tote bags, enter the coupon code "OpeningDay" and receive free shipping! Remember that I can make any team logo in the team colors, with coordinating felt flower. These bags are awesome for game days, or just around town. This special offer is good until 4/15, so take advantage soon! Feel free to contact me with any questions about special orders. Check out The Bees Times Three on Etsy today!
Subscribe to:
Posts (Atom)